 My custom new tab page. Theme consistent with my personal site.
If you’ve seen a typical college student’s laptop, you might be familiar with Momentum. This free Chrome extension “replace[s] new tab page with a personal dashboard featuring to-do, weather, and inspiration”.
However, after 5 years of looking at the same couple of pictures, motivational quotes, and the cheesy “What is your main focus for today?”, I was long overdue for a change.
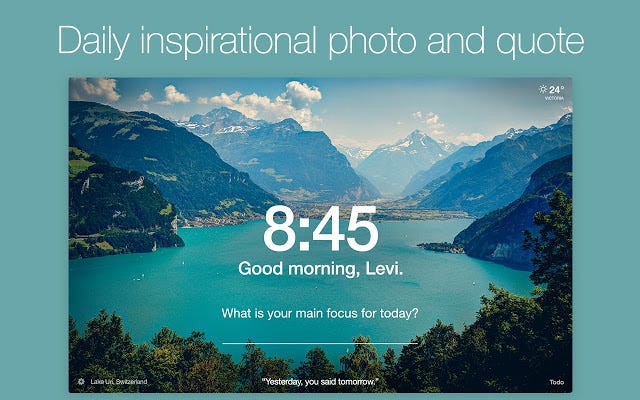 Momentum — no shade, just need to switch it up :)
Thankfully, we can make our own personalized override of the Chrome homepage/new tab page. It’s fast, easy, and you can customize it however you want!
Prereqs
This tutorial assumes you have some knowledge of Javascript and HTML/CSS. All good? Let’s get started 👍🏼
Implementation
0. Getting Started
Much like how every npm project requires a package.json, every Chrome extension needs a manifest.json for important information. This file goes in the root directory. This is all we need initially:
| { | |
| "name": "Chromepage", | |
| "description": "Personalized override of Chrome New Tab page.", | |
| "version": "1.0", | |
| "manifest_version": 2, | |
| "chrome_url_overrides": { "newtab": "index.html" } | |
| } |
Chrome recommends that developers put 2 for manifest_version so that’s what we’ll do.
The last line is the crucial part, we’ll be creating an index.html as our home page.
∞. Choose Your Own Adventure 🌎
In the root directory, create an index.html file. Here’s a super bare bones template:
| <!DOCTYPE html> | |
| <html> | |
| <head> | |
| <title>Welcome back</title> | |
| </head> | |
| <body> | |
| <p>Hello World!</p> | |
| </body> | |
| </html> |
Make sure you fill out the title tag or you’ll see an ugly “chrome://newtab”.
Andddd that’s it! You’ve just created an override of Chrome’s new tab page. Let’s make sure it works.
- Go to
chrome://extensionsin the address bar - Turn “Developer Mode” on the top left
- Click “Load unpack” and select the destination as this root directory
You should see it show up like so:
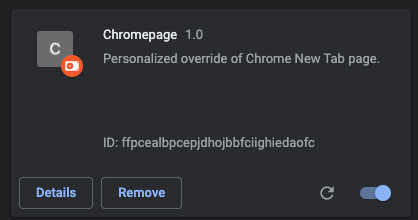 Your new extension.
Don’t worry if your ID is different!
Make sure that you’ve turned Momentum off if you’ve been using it. Now if you open a new tab or window, you should see the “Hello World!” from index.html.
That’s it. It’s that simple. If you know what you want yours to look like, seeya 👋🏼 If you want to see how I made mine, stick around to add a clock, greeting, and date.
1. Add Clock
I knew I wanted to add a clock like Momentum. I really liked the idea of flip clocks to add some animation. After some googling, I found this one by Harsha Bhat on CodePen.
 by [Harsha Bhat](https://codepen.io/harshabhat86). Look familiar?](https://cdn-images-1.medium.com/max/2000/1*z7VWH20Euyi_KpulX2qtMg.png) Flipping Clock by Harsha Bhat. Look familiar?
Flipping Clock by Harsha Bhat. Look familiar?
So I converted his Sass to an index.css , wrapped his JS in DOMContentLoaded event listener in a script.js, and linked the two new files and added <div class="clock"></div> to index.html 😅
You should check out his code if you’re interested in the nitty gritties, or see how I embedded it in my page in my GitHub repo.
I changed some of the CSS colors to fit my personal site theme!
2. Add Greeting
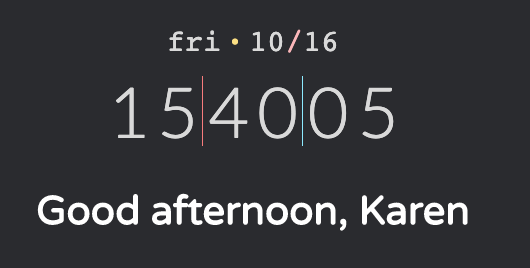
Just the clock looked a bit bare. So I recreated Momentum’s greeting: “Good [timeframe], Karen”.
All this takes is Javascript’s Date API. In index.html, we add
<p id="greeting">Good <span id="timeframe"></span>, Karen</p>In script.js, we’ll chain some if statements to determine what time of day it is:
| const date = new Date(); | |
| const currHour = date.getHours(); | |
| let timeframe; | |
| if (currHour >= 6 && currHour <= 11) { | |
| timeframe = 'morning'; | |
| } else if (currHour >= 12 && currHour <= 16) { | |
| timeframe = 'afternoon'; | |
| } else if (currHour >= 17 && currHour <= 20) { | |
| timeframe = 'evening'; | |
| } else { | |
| timeframe = 'night'; | |
| } | |
| document.querySelector('#timeframe').innerHTML = timeframe; |
And we have ourselves a greeting!
3. Add Date
In a similar vein, we can add the current date:
| <p id="date"> | |
| <span id="day"></span> | |
| <span id="dot">·</span> | |
| <span id="month"></span> | |
| <span id="slash">/</span> | |
| <span id="num-date"></span> | |
| </p> |
| const DAYS = ['sun', 'mon', 'tue', 'wed', 'thu', 'fri', 'sat']; | |
| const date = new Date(); | |
| const currDay = date.getDay(); | |
| const day = DAYS[currDay]; | |
| const month = date.getMonth() + 1; | |
| const numDate = date.getDate(); | |
| document.querySelector('#day').innerHTML = day; | |
| document.querySelector('#month').innerHTML = month; | |
| document.querySelector('#num-date').innerHTML = numDate; |
With the help of the Date API, our page knows the current time, timeframe, and date!
 Pulling everything together.
This is how I went about personalizing my page. The GitHub repo has more specific styling details. Many many thanks to Harsha Bhat for his amazing clock.
Conclusion
In this tutorial, we learned how to create a custom Chrome new tab page. You can get really creative. I merely gave some tips and suggestions on how to recreate mine 🙂
My goal with this extension was to make my browsing experience feel more personalized and home-y. Hopefully, I’ve helped you do the same! If anything, it’s quick, easy, and fun to build from scratch. If you got lost along the way, check out my GitHub repo. You can also install the version I made with the instructions in the repo README. Preview a live demo here.
Further Reading
Thanks for reading. Happy hacking!
Also published in Frontend Digest on Medium.