 16-inch MacBook Pro
Disclaimer: this article reflects my PC experience with mainly using a Lenovo Thinkpad X250 which may not be the universal PC experience!
A couple of months ago my mom received the newest 16-inch MacBook Pro from her company as her “upgraded” work laptop. Yet almost half a year later, she still hasn’t set it up, still hanging on to her Lenovo Thinkpad T460s. She claims the learning curve of switching from a PC to a Mac is too steep.
As a PC user for the majority of my life, I can understand this mindset. But after a year of using a 13-inch MacBook Pro, I can happily report I’m never going back to a PC ever again.
I put together this guide for the average PC user to more smoothly convert to a Mac enthusiast. Let’s start putting the Pro in MacBook Pro 😤
PC-esque Configurations
These are 6 setup “hacks” I strongly suggest implementing to improve the quality of life with your new Mac!
Scroll Direction
With the rise in popularity of touchscreens, Apple switched their default Mac scrolling direction to follow the likes of phones and tablets: the material moves in the opposite direction that it’s pushed. They call it the “natural” scroll. This is also the opposite direction that PC users are used to!
To change the scroll direction: go to System Preferences > Trackpad > Scroll & Zoom. Then uncheck the “Scroll direction: Natural” box.
Itsycal
I oh-so-dearly missed the mini calendar that popped up when I clicked on the date time on the menu bar of my old Thinkpad. Recently, I found a free Mac substitute, Itsycal.
Itsycal is endlessly customizable and also displays iCal events! Since I’ve synced my work GCal to my iCal, I can join Zoom meetings without even opening my browser.
Download instructions are on their homepage.
Right-click
Mac keyboards lack the physical right click. ⌃(control) + click, or tap with two fingers are the default equivalent. But you can also configure your trackpad’s bottom right corner be the right click area.
Go to System Preferences > Trackpad > Point & Click. Then under “Secondary Click”, choose “Click in bottom right corner”.
Show Desktop Hot Corners
Gestures are Mac trackpad shortcuts that usually require two or more fingers (more on this later). The gesture to show desktop is “Spread with thumb and three fingers” which always felt awkward for me. Instead, I wanted what my Thinkpad offered: move my mouse to the bottom right corner to immediately see my desktop.
To replicate this a Mac, we can use the concept of Hot Corners. Go to System Preferences > Desktop & Screen Saver > Screen Saver > Hot Corners. Then for the desired corner, choose “Desktop” from the dropdown menu. Be sure to checkout the other options for active screen corners while you’re there!
Split Screen
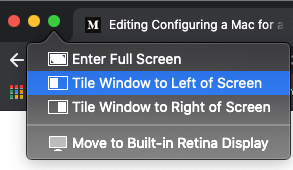
Hover over the green fullscreen button to achieve app split screen. However, Macs don’t have the native drag-to-one-side auto split screen of Windows. Magnet is a $2.99 Mac App substitute! Raving reviews claim this is the best $3 they’ve ever spent for the sake of productivity.
Virtual Desktops
Unfortunately, I never got to experience Windows 10 Virtual Desktops (always used Windows 7 and below). Fortunately, I incorporated this concept into my Mac life and I absolutely love it.
The idea of multiple virtual desktops helps me organize my workflow:
- Desktop 1 for general usage: Chrome + messaging + everything else
- Desktop 2 for coding only: VSCode + Terminal
- Desktop 3 for Spotify only
To add desktops, go to Mission Control (swipe up on the trackpad with 3 fingers). Click the + button in the top right corner and yay you got a new desktop.
To navigate between desktops, swipe right / left with 3+ fingers or click ⌃ + right / left arrow. Stay tuned for more on keyboard shortcuts!
As mentioned, you can assign apps to open in a certain desktop. For example, I assign Chrome to only Desktop 1. This means even if I’m in Desktop 2 and open Chrome, I’ll be taken to Desktop 1 and the app opens there.
To assign an app, press and hold or right click (how nice that we set that up above heh) on the app icon in the Dock. In the Options menu, choose the desktop you’d like. There’re also the two other general assignment options: “All Desktops” means the app will appear in every desktop, regardless of which one it was opened in. “None” means the app will only be visible in the desktop it was opened in.
Finally, you can temporarily change where an app is by launching Mission Control and manually dragging the app to the desired desktop.
Shortcuts
Keyboard and gesture shortcuts reduce fatigue on the pointer finger (from clicking) and improve workflow!
Keyboard
The Command key (⌘) will quickly become your new best friend. Most PC shortcuts work by swapping the Ctrl key with ⌘. For example this bulleted list of shortcuts is pretty unsurprising:
- ⌘ + C / X: Copy / Cut
- ⌘ + (⇧ shift) + V: Paste (with formatting)
- ⌘ + A: Select all
- ⌘ + B / I /U: Bold, Italicize, Underline text
- ⌘ + Z / Y: Undo / Redo
- ⌘ + S: Save
- ⌘ + P: Print
- ⌘ + F: Find
Additionally, these are some of the most common Mac shortcuts I use:
⌘ + space: Open Spotlight Search
⌘ + Q: Quit current app
⌘ + W: Close current app
⌘ + M: Minimize an app (shows up in your dock)
⌘ + tab: Switch between current apps. While still holding tab, you can use the arrow keys to navigate right and left between apps list as well.
⌘ + Click: Select multiple files
⌘ + delete: Delete selected files
⌘ + ⇧ + 3 / 4 / 5: Screenshot entire desktop / select screenshot area / screen record entire desktop
⌘ + ⌃ + space: Open emoji keyboard while typing
⌘ + ,: Open preferences for current app
The official full list of available Mac keyboard shortcuts can be viewed here.
*Note: you can switch the ⌘ and ⌃ keys by going to System Preferences > Keyboard > Modifier Keys and manually switch the two keys. I would NOT recommend this. It’s a Band-Aid solution, a cop out. You’re resisting the transition to becoming a pro Mac user!! I would just bite the bullet and try to adjust to the Command key. Since ⌘ is much closer to the space bar than the Ctrl key, I personally had to get used to using my thumb. But with use, it’s become muscle memory.*
Gestures
We’ve mentioned a few gestures above but here are the ones I use the most often.
3+ fingers swipe right and left: Swipe between desktops (uses Apple “natural” direction and cannot be changed)
3+ fingers swipe up: Launch Mission Control
Top right two finger swipe left: Show Notification Center
Of course there’s also the two finger pinch and zoom. All available gestures can be viewed in System Preferences > Trackpad > More Gestures.
Chrome Shortcuts
Finally, I’m gonna cover a couple of handy Chrome/browser specific shortcuts.
⌘ +(⇧) +T: Open new tab / (reopen most recently closed tab)
⌘ + (⇧) + N: Open new (incognito) window
⌘ + L: Jump to the address bar
⌘ + (⇧) + R: (Hard) refresh
⌘ + ⇧ + B: Hide / Show bookmarks bar
⌃ + tab: Switch to the tab immediately to the right
⌘ + ⇧ + [ / ]: Switch left and right between tabs
Trackpad swipe right and left with two fingers: Navigate forward and backward in browsing history
The full list of available Chrome specific shortcuts can be viewed here.
Conclusion
There are so many ways to configure your MacBook. These are just a couple of suggestions and shortcuts that work for me. Keep in mind I’m a singular Chrome window with less than 10 tabs, permanently empty Desktop/Trash, Inbox Zero type of person 😝
Hope this post gets you excited about your induction into the MacBook cult 🎉 while also improving your workflow! Feel free to comment which ones worked for you and if I’m missing anything. Thanks for reading!
Originally published in Mac O’Clock on Medium.