
My coworker, Ali, always forgets to eat lunch while working. Since we’re working remote, I wanted some sort of automated reminder message to ping him. Instead of using Slack’s native no-code solution, Slack reminders, I decided to build and deploy one from scratch because #QuarantineBoredom.
Like any reasonable person, I Googled “slack bot tutorial”, “how to build a slack bot from scratch”, and read a plethora of tutorials before diving in. I was interested in a Node.js implementation since that’s what I’m most familiar with. I also wanted a relatively straightforward configuration that didn’t require me to make 10 different accounts.
I finally settled on this tutorial from freeCodeCamp. This post will essentially be about how I took Bolaji Ayodeji’s implementation and made it work for me. We’ll be coding a slack bot that sends messages at scheduled times. Unlike Ayodeji’s article, users cannot interact with this bot.
This post will also talk about I deployed it to Heroku. Most Slack bot tutorials miss this final step. They act as if you want to run it locally every time you wanna use it 🙄
Prereqs
This tutorial assumes you have some knowledge of Javascript, Node.js, npm, and GitHub. All good? Let’s get started 👍🏼
Slack Registration
Before we start coding, we have to register our app on Slack!
 Classic Slack App
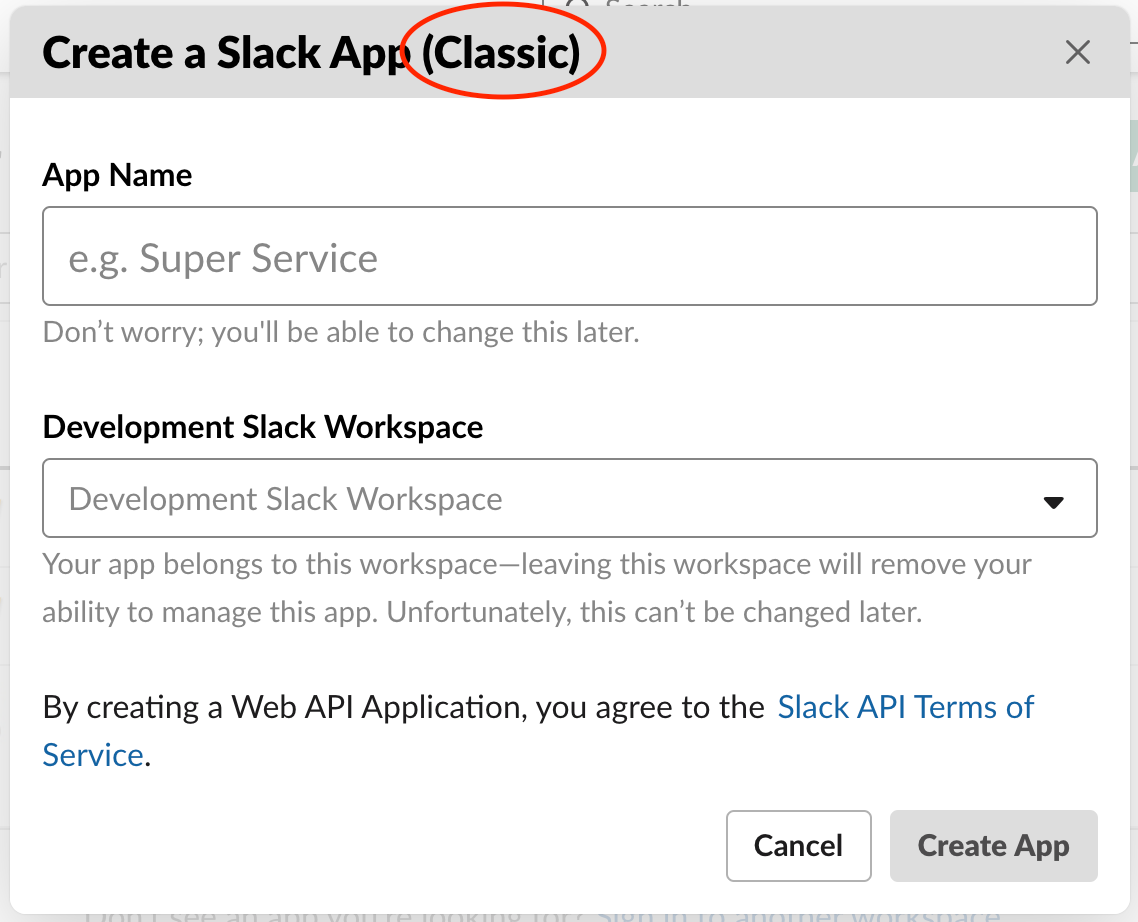
Make sure you’re signed into Slack and head over to Create a Slack App (Classic). It’s critical that you create a “Classic” app because the npm package we’re gonna be using, slackbots, only works with tokens generated from the old Slack app API. It will **NOT** work if you head to https://api.slack.com/apps and click on “Create New App”.
Enter your desired app name (I called mine “lunchbot”) and choose the workspace you want to add your new app to. Click Create App.
On the Basic Information page, scroll down to Display Information. This is the fun part! Customize the appearance of your bot. You can also do/change this later.
 The Bot User interacts with your workspace
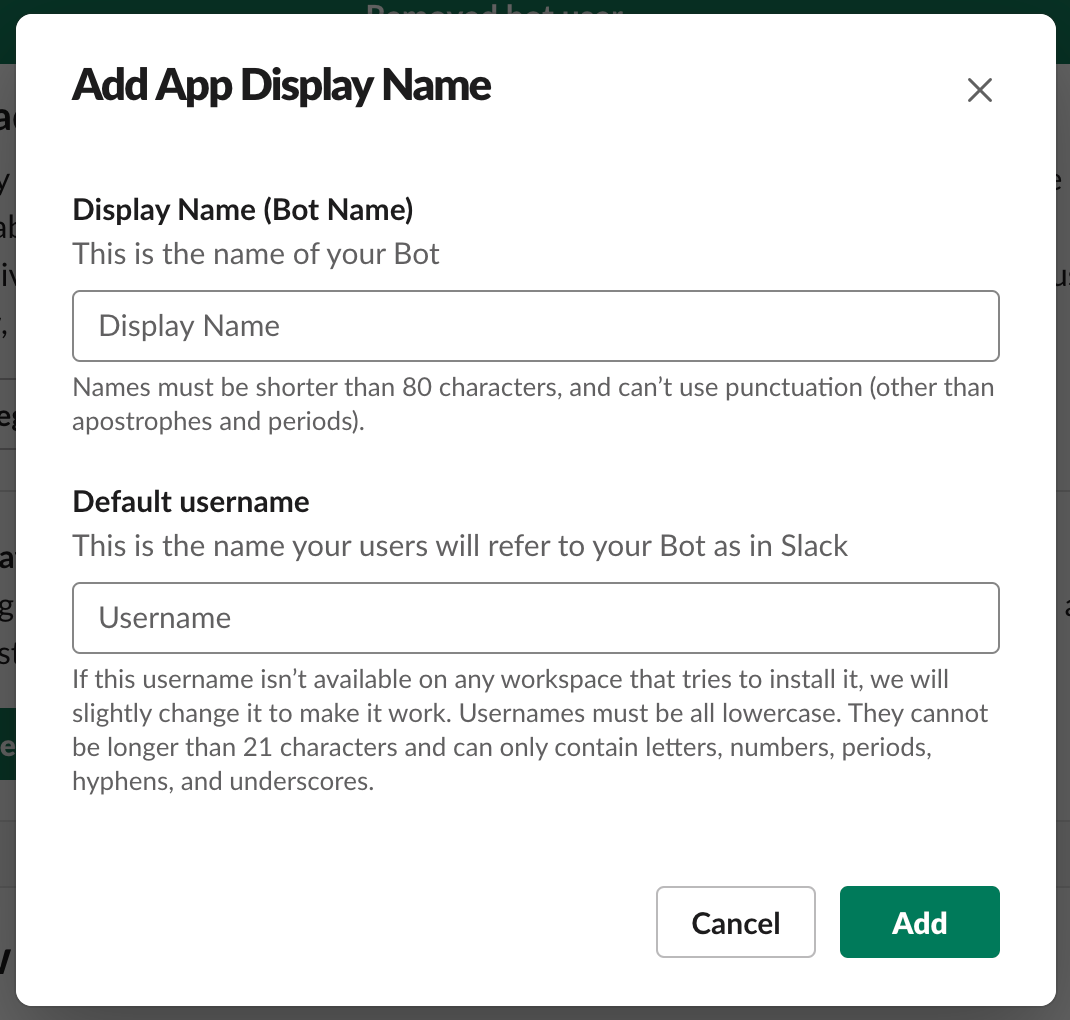
Next, at the top of the Basic Information page, under Building Apps for Slack, expand Add features and functionality. Choose the Bots card. We want our bot to be able to send messages so we need to Add Legacy Bot User. Fill in the two required fields: Display name and Default username. Toggle Always Show My Bot as Online as true.
Back to Basic Information > Building Apps for Slack, expand Install your app to your workspace and click Install App to Workspace. Click Allow.
Now head over to your Slack workspace: [your-workspace-name].slack.com. On the left side panel, scroll down until you see the Apps header. Click the + icon to the right and search for the app you just created. Click on your app and you should see it appear under the Apps header, with the online status!
Awesome, we’re done with this Slack setup for now. Onto the coding part.
Implementation
Getting set up
As mentioned, we’ll be using Node.js and npm. We also want the Heroku x GitHub integration later on so let’s start with an empty directory and
$ git initNext, we have to initialize npm:
$ npm initKeep on hitting enter until you generate your package.json.
We’ll be using three npm packages: slackbots, dotenv, and node-cron:
$ npm i slackbots
$ npm i dotenv
$ npm i node-cron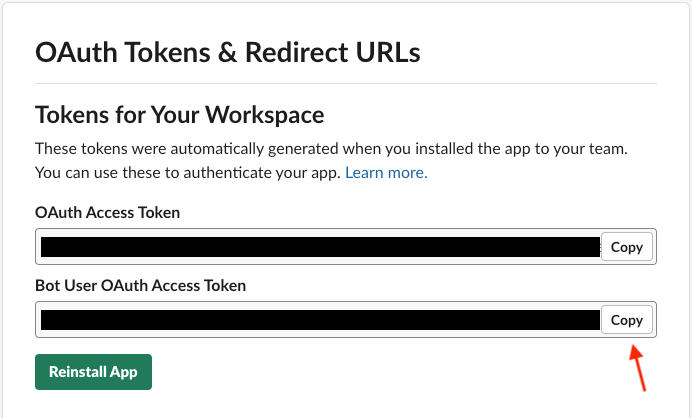 Copy the 2nd token (not the 1st)
Next, create a filed named .env. Here, we’re gonna store our Slack app’s authorization token. Head back to your app’s configuration page. Click this link and locate your app. Then go to Features > OAuth & Permissions. We want to copy the Bot User OAuth Access Token.
In .env, create the environment variable:
| BOT_TOKEN=[your-copied-token] |
Since we’re pushing this project to GitHub, it’s good practice to keep your authorization tokens safe! The dotenv npm package allows us to work with our environment variable 🙂
Finally, let’s create an index.js and set up our packages. This is where all our bot’s logic will live.
| const SlackBot = require('slackbots'); | |
| const dotenv = require('dotenv'); | |
| const cron = require('node-cron'); | |
| dotenv.config(); |
Add the start script to package.json under "scripts":
"start": "node index.js"This way, we can start the bot with npm start.
Building the Bot
We’ll be using the npm package slackbots. While you can build a Slack bot by using Slack API, this package handles all the API calls for us. With slackbots, we can code our bot in less than 30 lines.
To initiate the bot:
| const bot = new SlackBot({ | |
| token: `${process.env.BOT_TOKEN}`, | |
| name: '[your-app-name]', | |
| }); |
Make sure the name attribute exactly matches your registered app name (not the bot user name), including case.
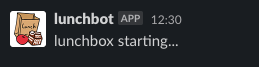
Let’s have the bot notify us when it starts:
| bot.on('start', function () { | |
| bot.postMessageToUser('[your-username]', '[your-app-name] starting...'); | |
| }); |
Now if you run npm start you should get notified that your bot is starting! Get used to this because you’ll be see this message a whole lot 😅
Yay the connection works!
Now, we want to schedule our bot to send a message at a specific time. You can check out all of slackbots’ methods on its npm page. The specific one we want is postMessageToChannel. I’ve found that in order for postMessageToUser to work, the user must have added the app to their workspace (and have it show up under Apps). Thus, we can surprise your coworkers by adding them to the group that your bot posts in, without them having to add the app!
To ensure the message gets sent at the right time, we’ll be using the node-cron npm packge. The scheduler syntax can be found here. I modularized this logic into another function called createJob. This is what I ended up added for my bot:
| function createJob() { | |
| const task = cron.schedule( | |
| '32 12 * * 1-5', | |
| () => { | |
| bot.postMessageToChannel('lunchbot-test', 'go eat lunch ali'); | |
| }, | |
| { | |
| scheduled: true, | |
| timezone: 'America/New_York', | |
| } | |
| ); | |
| task.start(); | |
| } |
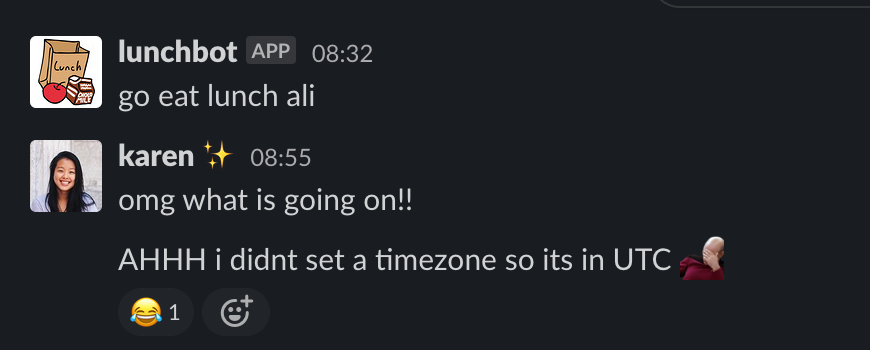
'32 12 * * 1–5' means that this message will be sent every weekday at 12:32 PM, right in time for lunch! Make sure you add your timezone because without this configuration, node-crone operates in UTC. This is a list of all the valid timezone strings node-code accepts.
The last piece is to call createJob when the bot starts:
| bot.on('start', function () { | |
| bot.postMessageToUser('[your-username]', '[your-app-name] starting...'); | |
| createJob(); | |
| }); |
That’s it! You’ve just created your own slack bot in less than 30 lines of code 🎉 You can mess around with when the messages should get sent/to whom for more testing and experimenting if you want. When you’re ready, push your code to a GitHub repo and let’s deploy to Heroku!
Deploying
Heroku
Log in to, or create a Heroku account (it’s free). On your dashboard, click on New > Create new app. Name your app, choose a region, and hit Create app. Under Deployment method, choose GitHub. Link your GitHub account if you haven’t already. Search for your bot’s repo and click Connect.
 Heroku Configuration Variables
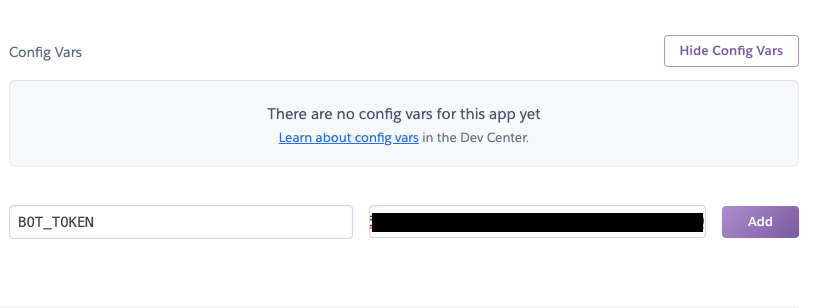
Then under Settings > Config Vars > Reveal Config Vars enter BOT_TOKEN as the KEY and the same value from your .env file as the VALUE. Click Add to save.
Head over to Deploy > Manual deploy and click Deploy Branch. Within seconds, you should get pinged by your bot telling you that your bot is starting! Very exciting.
Heroku Scheduler
If you’ve used Heroku before, you’ll know that their free tier has limitations: namely your app “goes to sleep” after 30 minutes of inactivity. This would be fine except our app doesn’t have a frontend. Unless you manually deploy the app every time, it will forever be asleep after the initial 30 min. This is where Heroku Scheduler comes in.
In the case of lunchbot, we only want lunchbot to be awake before 12:32PM every weekday so the cron job can kick in and send the message.
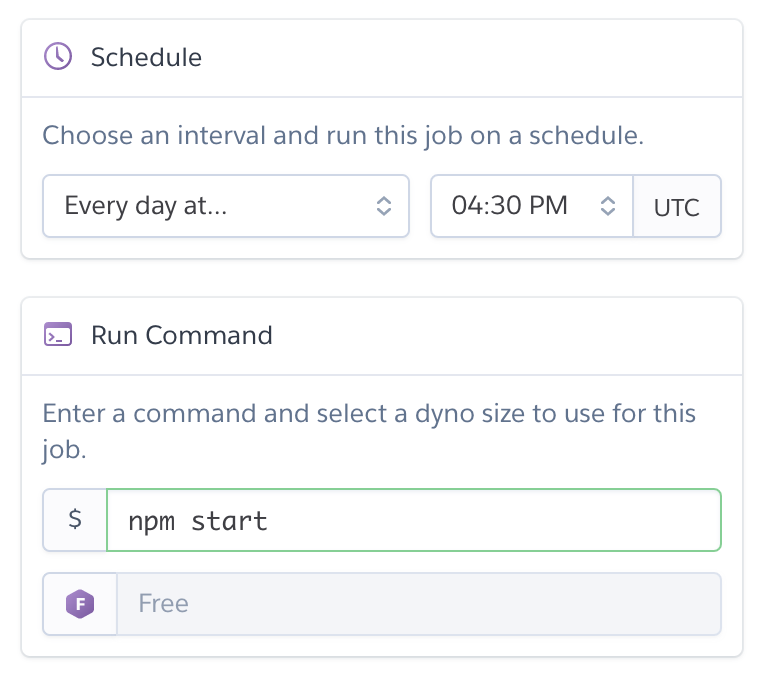
On your app’s Heroku dashboard, go to Resources > Add-ons and search for and select Heroku Scheduler. Click on Provision.
Heroku Scheduler should appear under Add-ons. Click on the name and it should redirect you to the scheduler’s dashboard. Click on Create Job. Enter the frequency that you want your app to start at. For me, it made sense to choose Every day at… 4:30 PM UTC. The command we want the scheduler to run is npm start so be sure to enter that. Click **Save Job **and you’re good to go!
With Heroku Scheduler, we’ve gotten around the free tier problem of the app falling asleep. The caveat is there is no guarantee Heroku Scheduler executes on time. When creating a job, there’s the disclaimer Jobs run within a time window as close to the schedule as possible. In my experience with lunchbot, there have been times that the job didn’t execute until 2 hours later. Then our cron job doesn’t work anymore and our bot fails to notify Ali to eat lunch ☹️ Unfortunately, this is just the consequence of using Heroku for free.
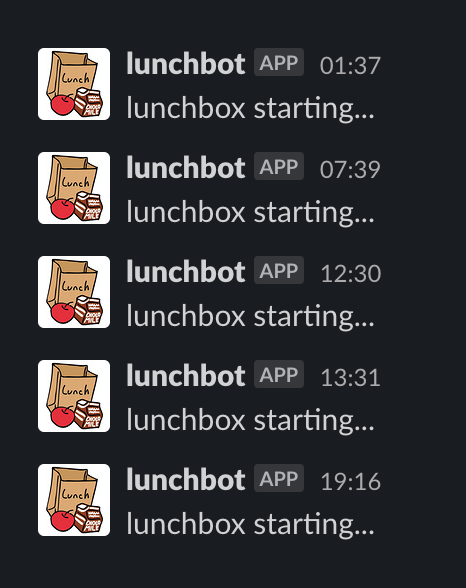
Another note: Although Heroku claims your app goes to sleep after 30 minutes of inactivity, Heroku also randomly starts your app quite frequently:
 What is going on
If you don’t want to get spammed by your bot, you should probably remove the on start message to yourself.
Anyways yay! You have a functional Slack bot. Below I’ve included some tricky things to check if you’re running into trouble. Here’s also my actual GitHub repo for lunchbot.
Troubleshooting
 node-cron is UTC by default oops
The answer should be yes to these questions ✅
- Did you make sure to create a Classic Slack app?
- Does your bot show up under Apps?
- Did you set a timezone in
cron.schedule()? - Did you use the exact name of your app in
new SlackBot()? - Did you configure your Heroku variables?
- Did you set the correct UTC time for your Heroku Scheduler job?
Conclusion
In this post we used a couple of npm packages to slap together a Slack bot in less than 30 lines of code. We deployed the app to Heroku and used Heroku Scheduler to wake up the bot in time to send a daily message. The tutorial I based this on goes more into depth about how to make your bot interactive. Definitely check it out if you’re interested in that.
That’s all I have for you. Go forth and annoy (or impress) your coworkers 😛
Thanks for reading. Happy hacking!
Originally published in Level Up Coding on Medium.